Most base failures aren’t dramatic. They’re slow, annoying ones: sinking corners, damp creeping in, hairline cracks that widen each winter, or a timber floor that feels spongy because the ground underneath never stopped moving.
This guide is the unskippable foundations bit — the real-world detail people leave out. We’ll cover ground conditions, drainage, compaction, membrane choice, and what actually works for slab bases, paving, timber frames, and concrete pads.
Step 1: Choose the right base type (not the “easiest” one)
Your base choice should match two things:
- What you’re building (a light shed vs a heavy insulated garden office)
- What you’re building on (firm gravelly ground vs soft clay that turns to soup)
Here are the four main options.
1) Concrete slab base (the “forever” option)
Best for: garden offices, heavy sheds, workshops, anything insulated with proper flooring
Pros: strongest, most durable, ideal for anchoring a building
Cons: most labour, messiest, hardest to fix if you get it wrong
A slab is the gold standard because it spreads weight evenly and doesn’t care if the building’s load changes over time (furniture, desks, storage).
Typical thickness:
- 100mm slab for most garden offices/sheds
- 150mm if ground is soft or loads are heavy
2) Paving slab base (popular, but not idiot-proof)
Best for: standard sheds and smaller timber buildings
Pros: easier than pouring a full slab, less mixing, can look neat
Cons: depends heavily on prep; slabs rock and settle if the sub-base is weak
This works brilliantly only if you treat it like a proper patio build: compacted hardcore, sand bed, level, and edged so it can’t wander.
3) Timber frame base (quick… if your ground is dry and stable)
Best for: sheds on well-drained ground, temporary structures
Pros: faster, less digging, easier to adjust
Cons: timber hates ground moisture; poor airflow = rot risk
Timber bases fail when people build them like a deck sitting in a puddle. If you go this route, it needs a well-prepped sub-base and ventilation.
4) Concrete pads (good middle ground on awkward sites)
Best for: sloping gardens, uneven ground, light-to-medium buildings
Pros: less concrete, great for slopes, easier to position accurately
Cons: load is concentrated; pads must be properly placed and level
Pads are underrated. Done well, they give you a stable, clean base without needing a full slab.
Step 2: Understand your ground (because it decides everything)
Before you start digging, do a basic “what am I dealing with?” check.
Quick soil test (no lab required)
Dig a small test hole about 300–400mm deep:
- Gravel/sandy soil: drains well, compacts nicely → easiest to build on
- Firm clay: stable when dry, moves when wet → needs drainage thinking
- Soft clay/made ground: compresses over time → deeper sub-base, stronger edges
- Peat/organic soil: spongy, unstable → avoid, dig out until you hit something solid
If your spade sinks easily and the hole fills with water fast, don’t “hope it’ll be fine”. That’s how bases end up dipping a year later.
Step 3: Check drainage and slope (without fancy tools)
You don’t need lasers. You just need to be methodical.
Drainage test (10-minute reality check)
Dig a small hole around 200mm deep and fill it with water.
- If it drains away within 30–60 minutes: fine
- If it sits there for hours: you have drainage issues
- If it’s still there the next day: plan for serious water management
Slope check using string and a spirit level
- Hammer a stake at the “high end” and one at the “low end”
- Run string tightly between them
- Hold a spirit level against the string to make it level
- Measure the gap between string and ground at the low end
This tells you exactly how much fall you need to deal with. Even a 40–60mm slope over a short run can matter for doors and floors.
Rule of thumb: you want water running away from the building, not towards it.
Step 4: Base failures come from prep (not pouring)
This is the part people rush. And it’s why bases fail.
The “hardcore” truth
Your sub-base exists to stop your base moving. It must be:
- thick enough
- properly compacted
- built in layers (not dumped in one go)
Hardcore depth guide:
- Light shed: ~75–100mm compacted
- Garden office: ~100–150mm compacted
- Soft ground: ~150–200mm compacted
Compaction: what “good” looks like
Hardcore must be compacted in layers (lifts) of about 50mm.
If you tip in 150mm and stomp on it, it’ll compact unevenly, settle later, and your base will crack or dip.
If you can afford one hire item: get a wacker plate. It’s the cheapest way to avoid years of annoyance.
Step 5: Don’t mess up the membrane (this is where damp starts)
A membrane isn’t decorative. It’s doing real work:
- stops moisture rising
- stops the slab “drying out into the ground” too quickly
- helps prevent weeds (but that’s not the main job)
Your Trade Building Merchants will usually stock the membrane grades that don’t tear after a week.
Cheap membranes rip during the build, shift, and end up doing almost nothing. Get a proper DPM, overlap joints, and tape them.
Basic membrane rules:
- overlaps should be generous (think 150–300mm)
- no holes or tears
- bring it up the edge slightly where possible
- don’t confuse a weed membrane with a DPM
Option A: How to build a concrete slab base properly (step-by-step)
This is the “do it once” method.
1) Mark out and excavate
Mark your base footprint, then excavate:
- remove turf/organic layer
- dig down for: hardcore + sand blinding + slab thickness
- aim for clean, firm ground
For a typical office slab you might allow:
100–150mm hardcore + 25mm sand + 100mm concrete
So around 225–275mm below finished height.
2) Add and compact hardcore
- add hardcore in layers
- compact each layer
- keep it roughly level
3) Add sand blinding (thin)
This protects your membrane from sharp hardcore edges.
- 20–30mm is enough
- level it roughly (it doesn’t need to be perfect)
4) Lay your membrane
Overlap and tape joints.
5) Build the formwork (your slab’s shape depends on this)
This part decides whether you get a clean slab or a wobbly mess.
Don’t cheap out on trade building supplies like edging and formwork, that’s where cracks start.
Bad formwork bows outward under wet concrete pressure. That changes slab thickness, weakens edges, and creates stress points.
6) Add reinforcement mesh (where needed)
Mesh helps reduce cracking and improves strength. It must sit within the slab, not on the ground.
Use spacers so the mesh ends up around mid-depth.
7) Mix ratio and concrete consistency (keep it practical)
For small jobs, many people mix by volume. A common DIY mix is:
- 1 part cement
- 2 parts sand
- 4 parts aggregate
You’re aiming for workable concrete that holds shape — not soup.
Too wet = weaker concrete and more shrinkage cracking.
8) Pour, level, and finish
- pour evenly
- tamp it down to remove air pockets
- screed it level using a straight edge
- float finish (don’t overwork it)
9) Cure it properly
Concrete doesn’t “dry”, it cures. That needs moisture.
Cover it lightly (sheeting helps) and avoid walking on it too early.
Option B: How to build a paving slab base that doesn’t rock
If you’re doing slabs, treat it like a proper patio:
- excavate
- hardcore + compact
- sand layer, levelled
- slabs laid tight and level
- edge restraint installed so slabs can’t creep
The slab base fails when slabs end up “floating” on uneven sand over soft ground.
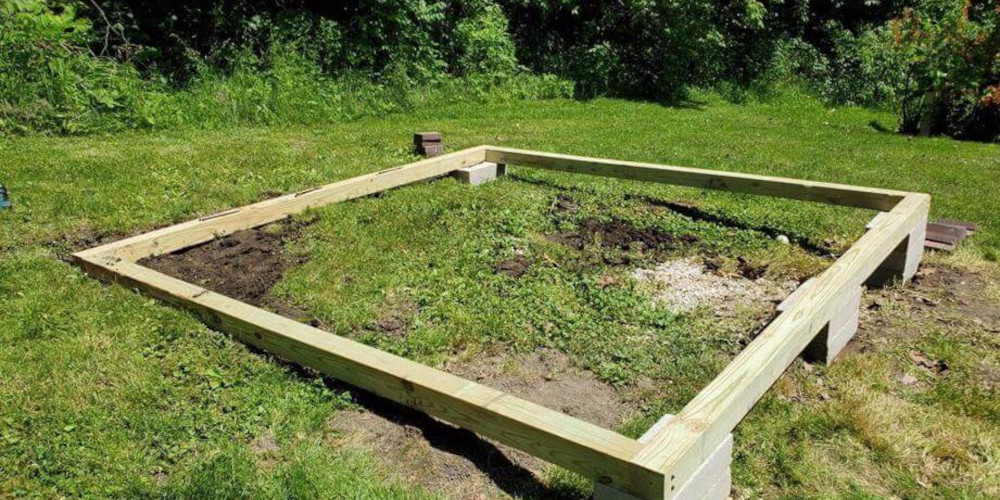
Option C: Timber frame base (the rot-resistant way)
Timber bases can last — but only if they stay dry.
Key rules:
- use pressure-treated timber suitable for ground-adjacent use
- keep timber off direct wet soil
- allow airflow under the base
- use proper fixings and brackets (galvanised or stainless)
A timber base wants to behave like a raised floor system, not a sponge.
Option D: Concrete pads (ideal for slopes)
Pads work when:
- each pad sits on properly compacted ground/sub-base
- pads are aligned and level with each other
- your frame is designed to span between them
Pro tip: mark pad positions carefully and double-check diagonals so everything squares up.
Hardcore mistakes that ruin bases
These are the ones you’ll feel later.
1) Poor compaction (the silent base killer)
It might look flat today. It won’t stay flat.
2) Wrong membrane choice
Weed membranes aren’t DPMs. Tearing the membrane and ignoring it is basically inviting damp.
3) Bad edge formwork
Weak edges crack first. Wobbly boards = wobbly slab.
4) Not accounting for water run-off
If the base becomes the lowest point in the garden, it’ll collect water. Even a perfect slab can’t fix bad water behaviour.
5) “Bargain materials”
Most failures come from bargain materials, not the build itself.
Base materials are boring — but quality hardcore, decent membrane, solid fixings and proper timber treatment are exactly where builds survive winter after winter.
Materials breakdown (what you actually need)
Here’s a practical checklist of the usual suspects:
Sub-base layers
- hardcore (MOT Type 1 or similar)
- sand blinding layer
Moisture control
- DPM / membrane (proper grade, taped joints)
Slab build
- cement
- sand
- aggregate (or ballast)
- reinforcement mesh + spacers
- formwork timber + stakes + screws
Timber base build
- pressure-treated timber (appropriate rating)
- joist hangers / corner brackets
- exterior-grade fixings (galv/stainless)
- ground anchors (if needed)
Tools (that genuinely matter)
- wacker plate (hire)
- spirit level (longer is better)
- string line + stakes
- tamper (if no wacker)
- wheelbarrow, shovel, rake
Cost comparison and realistic timelines
Costs vary wildly by size and access, but the pattern is predictable:
Cheapest (material-wise)
- timber frame base (if ground is easy)
- paving slabs (if you already have them)
Best value long-term
- concrete slab (especially for offices)
Time expectations (realistic DIY)
- Day 1: dig + waste removal
- Day 2: hardcore + compaction
- Day 3: formwork + membrane + mesh
- Day 4: pour slab
- Next 2–7 days: curing time before heavy loads
If access is tight, everything takes longer. Wheelbarrowing materials through a house/gate adds a surprising amount of time and pain.
Base inspection checklist (do this before building anything on top)
Run through this before you install a shed or office frame:
Ground + prep
- soft/organic soil fully removed
- hardcore depth matches building weight
- hardcore compacted in layers (not one dump)
- no obvious soft corners or bounce
Drainage
- water runs away from base, not towards it
- no “ponding” around edges after rain
- ground isn’t permanently boggy
Level + square
- base is level in both directions
- diagonals match (base is square)
- finished height allows for door clearance and thresholds
Membrane + moisture
- proper DPM used (not a cheap weed sheet)
- overlaps done and taped
- no punctures or tears
Structure readiness
- edges are strong and clean
- slab thickness consistent
- fixings/anchors planned (if needed)
If you tick all these off, you’re in the small minority of DIYers who’ve built a base that won’t cause problems later.
Final thought: foundations are where “easy builds” go to die
Garden buildings don’t collapse because the walls are wrong. They fail because the base moves, holds moisture, or cracks around weak edges.
Do the prep, use decent materials, and treat drainage like a first-class issue — and everything you build on top becomes ten times easier.
If you want, I can also provide a quick “base calculator” section (materials quantities by size) and a diagram-style layout for each base type.